
You've probably had this moment already.
You hear that stablecoins can earn yield onchain. You open a thread, a dashboard, or a product page, and the first thing it asks for is a wallet. Suddenly the simple idea of “put idle USDC to work” turns into a technical detour filled with seed phrases, browser extensions, networks, and warnings that sound expensive if you get them wrong.
That hesitation makes sense. A wallet is familiar in everyday life, but in crypto it feels loaded with risk and jargon. The good news is that the underlying idea is simpler than it looks. Once you understand what a wallet does, the rest of DeFi starts to click.
Your Digital Gateway to Decentralized Finance
A physical wallet has always been easy to understand. Historically, the wallet has been a compact physical container for cash and cards, and that long-standing form factor helped make it a universal everyday carry item, which is why it's such a useful starting point for understanding its digital evolution, as described in the wallet's historical background.
That familiar object does two jobs. It holds access items and it travels with you. Your driver's license, cards, transit pass, and some cash all stay ready for use when you need them.
A crypto wallet works in a similar way, but for a different environment. It isn't a leather sleeve in your pocket. It's your access point to assets and apps on a blockchain. If you want to swap tokens, move funds, sign into a DeFi app, or put stablecoins to work, your wallet is the tool that lets you do it.
Why this feels confusing at first
Individuals don't get stuck on the idea of stablecoins. They get stuck on the first setup step.
You might be thinking:
“Is a wallet where my crypto is stored?”
“Is this the same thing as my exchange account?”
“Why do I need a wallet just to earn yield?”
Those are the right questions. In crypto, the wallet is less like a container and more like a secure keyring for the financial internet.
Practical rule: If a DeFi app is the website you want to use, your wallet is the login, permission layer, and signing tool that lets you act there without handing control to someone else.
That's why the wallet matters so much for earning onchain. It's the thing that turns you from a spectator into a participant. Without it, you can read about DeFi all day and never interact with it.
The mental model that helps
Think of three layers:
Physical wallet for cash and cards
Mobile wallet for tap-to-pay and digital credentials
Crypto wallet for blockchain-based assets and apps
Each step moves the wallet idea from storage toward access. If you work with teams that need clearer explanations for this shift, strong visuals help a lot. This is also where expert blockchain video services can make technical wallet concepts easier to teach across products, communities, and onboarding flows.
For DeFi, your wallet isn't the finish line. It's the front door.
How a Crypto Wallet Actually Works
The easiest way to understand a crypto wallet is to stop thinking about coins first and think about keys.
A modern digital payment wallet protects sensitive card data with tokenization and encryption, acting as an abstraction layer between you and the payment system. A crypto wallet plays a similar role, but instead of payment tokens it uses cryptographic keys to let you control assets on the blockchain without exposing your master secret, as explained in this digital wallet overview.
A visual makes this much easier to grasp:
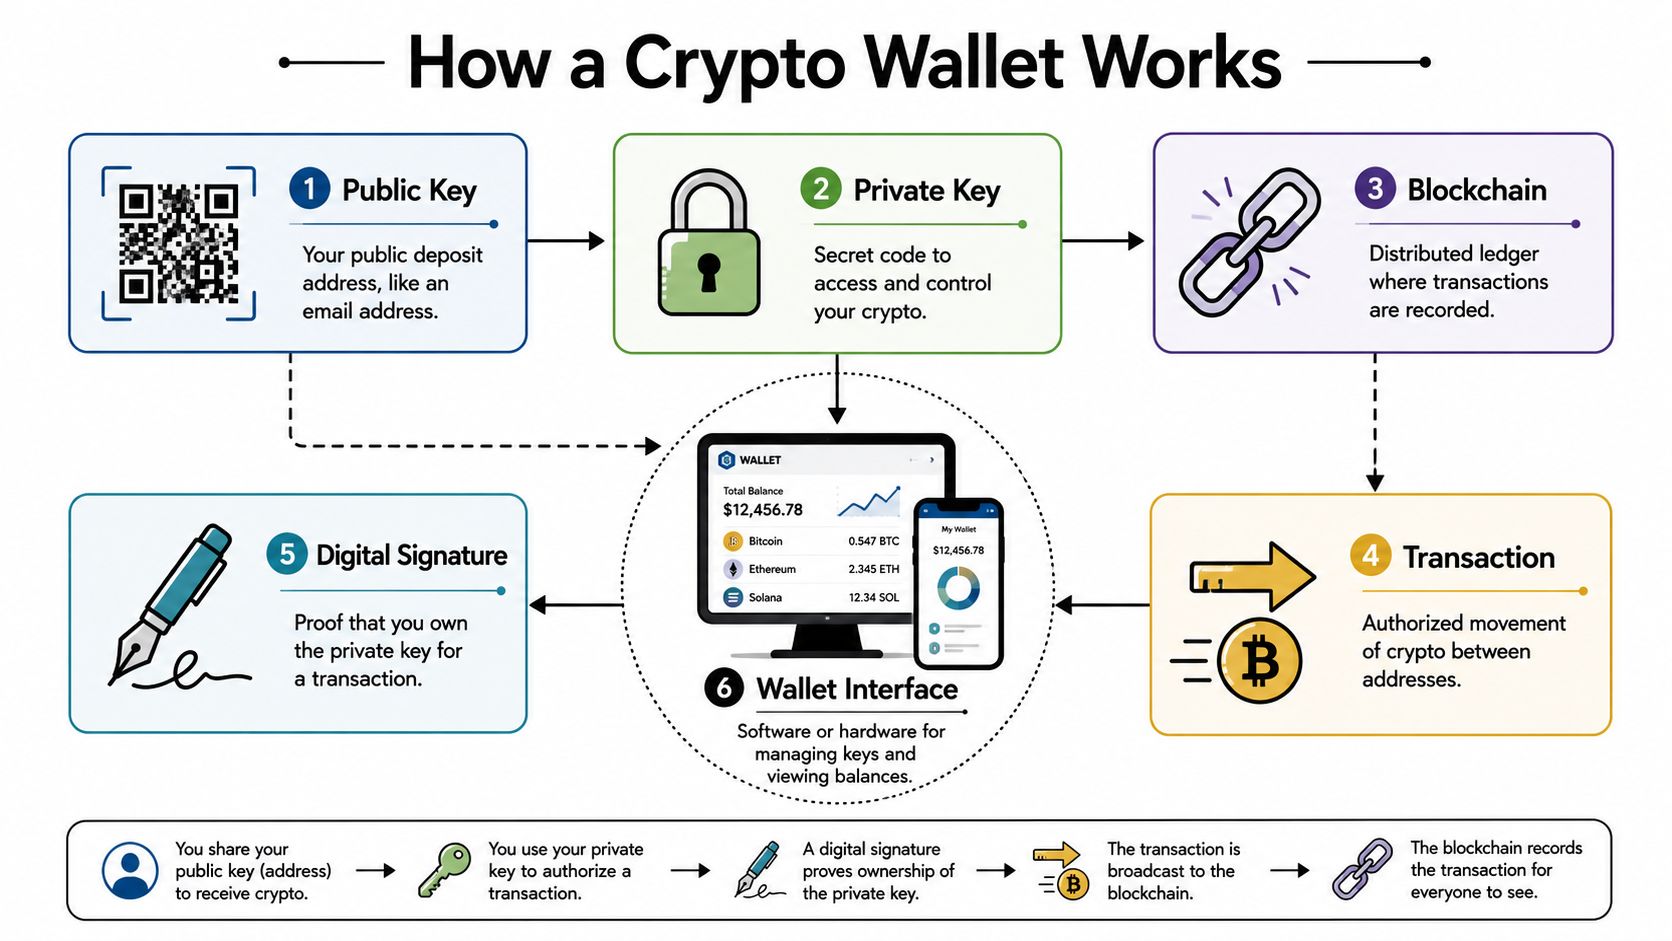
Public key, private key, and address
Start with the email analogy.
Your public address is like your email address. People can send assets to it. Sharing it is normal.
Your private key is like the password to that email account, except with much higher stakes. Whoever controls it can authorize transactions. You never share it.
Your wallet app sits in the middle and gives you a usable interface so you don't have to handle raw cryptography directly. If you want a second beginner-friendly explanation, Yield Seeker's guide on what a crypto wallet is is a useful companion.
What the wallet app is really doing
When you open MetaMask, Rabby, or another wallet, you're not opening a vault full of coins. You're opening a tool that helps you:
View balances tied to your address on the blockchain
Create transactions when you want to send or interact
Sign approvals so apps know you authorized an action
Manage networks like Ethereum or Base
The assets themselves live on the blockchain. The wallet gives you the authority to control them.
Here's the simplest flow:
Someone sends tokens to your address.
The blockchain records that balance at your address.
Your wallet reads that state and displays it.
When you send funds out, your wallet uses your private key to create a valid digital signature.
The network checks that signature before accepting the transaction.
Your wallet doesn't “hold the coins” the way a pocket wallet holds cash. It holds the power to prove that a blockchain address belongs to you.
The seed phrase is the part that matters most
If there's one thing to take seriously from day one, it's the seed phrase.
This is the recovery phrase that can rebuild your wallet if your laptop dies, your phone is lost, or your browser extension disappears. In practice, it acts like the master backup to the private keys your wallet derives and manages.
That's why people say the seed phrase is the wallet.
If someone gets it, they can usually restore the wallet elsewhere. If you lose it and also lose device access, recovery may be impossible.
A short video helps tie these pieces together before you move on to setup:
One practical example
Say you want to deposit USDC into a DeFi app.
You visit the app. It asks to connect your wallet. Your wallet pops up and asks for approval. Later, when you deposit, the wallet asks you to sign or confirm that action. The app never needs your password to the wallet. It just needs a cryptographic proof that you approved this specific action.
That's the key idea. The wallet is your signing device for blockchain actions.
Choosing Your First Crypto Wallet
The first wallet choice usually feels bigger than it is. You're really making two decisions.
The first is who controls the keys. The second is how often that wallet stays online.
For the online versus offline question, the right mental model is the same one people already accept in digital payments. Different wallet technologies involve different tradeoffs in infrastructure and user experience, and in crypto the hot-versus-cold split reflects a similar tradeoff between convenience for frequent use and stronger protection for long-term holdings, as noted in this wallet technology discussion.
Custodial and non-custodial
A custodial wallet means another platform holds the keys for you. A centralized exchange account is the common example. It feels familiar because account recovery is easier and the product handles more of the security burden.
A non-custodial wallet means you hold the keys. That gives you direct control and direct responsibility. This is the standard setup for connecting to DeFi apps.
Think of it this way:
Custodial is closer to money in a bank app
Non-custodial is closer to holding your own physical wallet
Hot and cold
A hot wallet stays connected to the internet through a browser extension, mobile app, or desktop app. It's the practical option for learning, signing transactions, and using dApps regularly.
A cold wallet keeps key material offline, usually through a hardware device. It's less convenient for constant activity, but better suited to storing larger balances you don't need to move every day.
Crypto Wallet Types Compared
Wallet Type | Who Holds Keys | Best For | Example |
|---|---|---|---|
Custodial wallet | Third party | Beginners who want simple account recovery | Exchange account |
Non-custodial hot wallet | You | Daily DeFi use, connecting to apps, small to moderate working balances | MetaMask, Rabby |
Non-custodial cold wallet | You | Long-term storage, larger balances, lower activity | Hardware wallet |
How most people should choose
If you're just getting started and want to learn by doing, a non-custodial hot wallet is usually the cleanest entry point. It lets you connect directly to apps and understand how onchain actions work.
If you already know you'll keep meaningful balances in crypto, a two-layer setup makes more sense:
Use a hot wallet for active use
Use a cold wallet for storage and infrequent transfers
For a broader look at options, Yield Seeker's article on best DeFi wallets is a practical place to compare tools before you install one.
Don't optimize for maximum complexity on day one. Optimize for a wallet setup you'll actually understand and use correctly.
A simple recommendation
For most DeFi beginners:
Start with Rabby or MetaMask
Use it as a non-custodial hot wallet
Keep the amount small while learning
Upgrade to a hardware wallet once your habits are solid
That gives you enough control to use DeFi without overengineering your setup before you've made your first onchain action.
Setting Up Your Wallet in Three Steps
Once you've chosen a wallet, the setup itself is straightforward. The part that matters isn't clicking through the installer. It's building the right habits while you do it.
Step 1 Download the official wallet app
Pick a wallet like MetaMask or Rabby and install it only from the project's official site or verified app store listing. Don't use a random search result, a DM, or a sponsored link you haven't checked carefully.
Why this matters is simple. Fake wallet downloads are one of the easiest ways attackers steal seed phrases and wallet access from new users.
A good habit is to bookmark the official site after you confirm it once. Then use that bookmark every time.
Step 2 Create the wallet and note your address
After installation, the wallet will guide you through creating a new wallet. You'll set a local password for that device and then receive your wallet address once setup is complete.
That local password is useful, but don't confuse it with the core recovery layer. It protects access to the wallet app on that device. It does not replace your recovery phrase.
During this step, notice what the interface is showing you:
A wallet account name such as Account 1
A public address you can copy to receive funds
A network selector for chains like Ethereum or Base
This is the point where the wallet stops being abstract. You can now receive assets at your address.
Step 3 Write down the seed phrase offline
This is the essential step.
When the wallet shows you the recovery phrase, write it down by hand and store it somewhere secure offline. Don't save it in your notes app. Don't email it to yourself. Don't take a screenshot. Don't paste it into cloud storage.
Why? Because any digital copy creates more places where that phrase can leak.
A workable approach is:
Write it clearly on paper
Check that every word is in the right order
Store it in a secure location
Consider a second offline backup in a separate secure place
If you skip proper seed phrase storage, you haven't finished setting up your wallet. You've only installed the app.
What to do right after setup
Before you rush into DeFi, do a quick readiness check:
Confirm the wallet opens normally
Copy your public address once and save it in a safe reference file
Make sure you can find the network selector
Review where your seed phrase backup is stored
At that point, your wallet is ready to receive funds and connect to apps. The next useful milestone is seeing it work in a real DeFi flow.
Connecting to Yield Seeker on Base Chain
The first time you connect a wallet to a dApp, it can feel more dramatic than it is. In practice, you're just letting a web app recognize your address and ask for permissioned actions through your wallet.
This infographic shows the flow clearly:
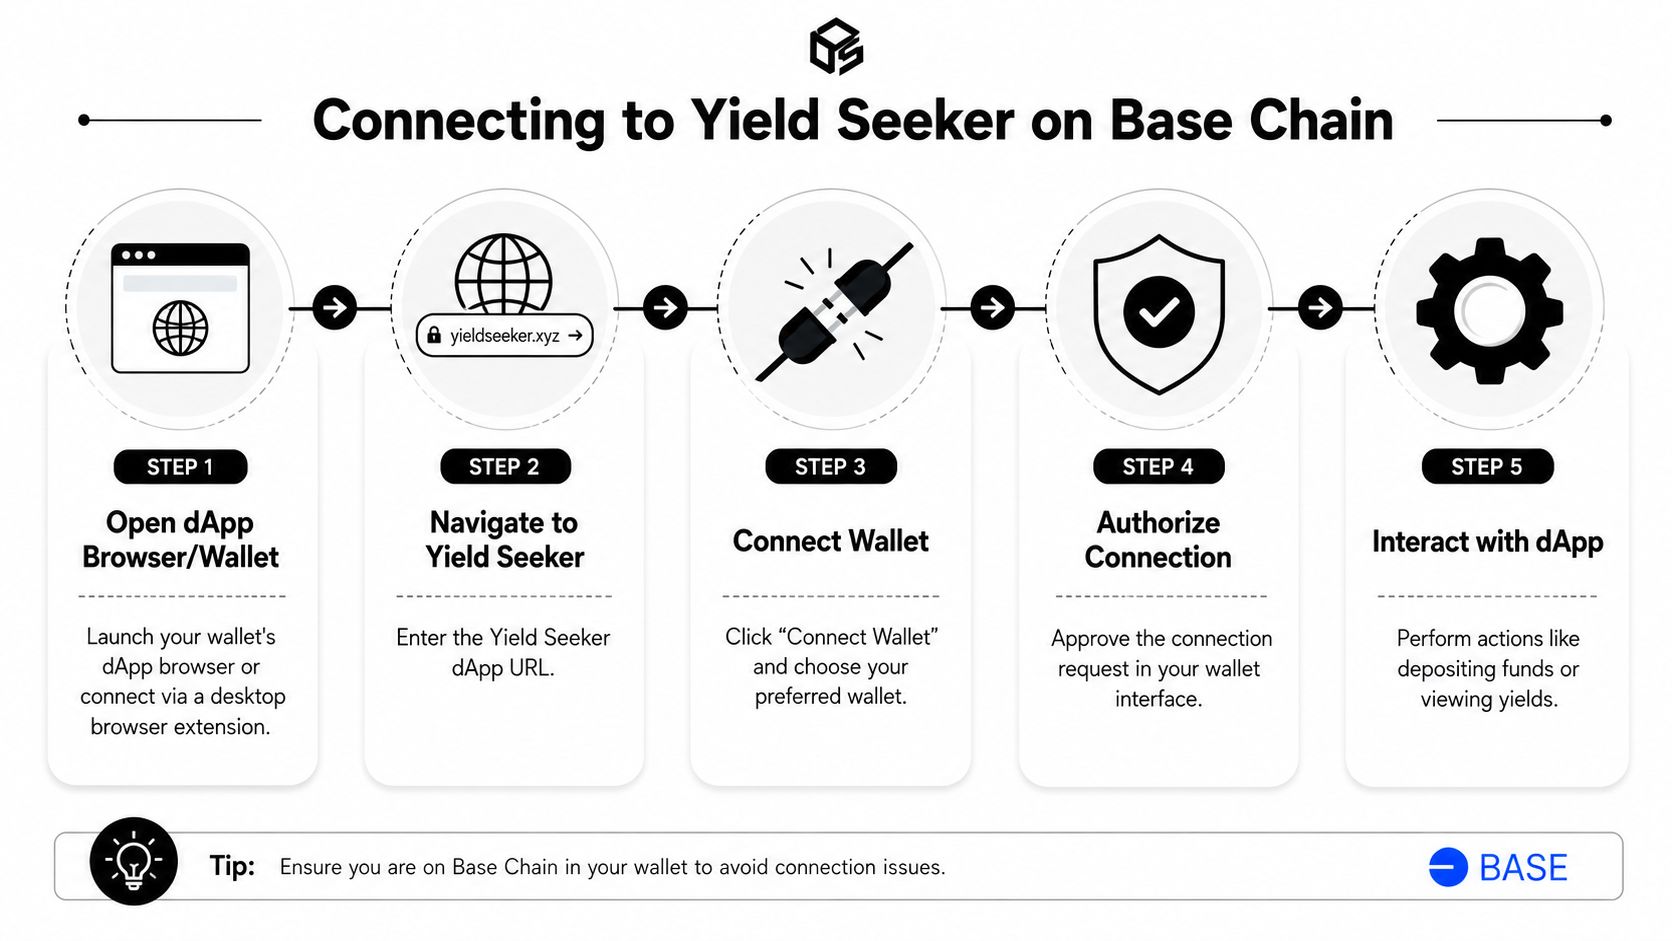
The connection flow
Open the app in a browser where your wallet extension is installed. If the product supports wallet-native browsing on mobile, you can also use that route, but desktop is usually easier for a first connection.
Then follow the normal sequence:
Visit the app and click Connect Wallet
Choose your wallet, such as Rabby or MetaMask
Approve the connection request in the wallet popup
Check that the wallet is on Base
Confirm that your wallet address appears in the app interface
If you want more context on the network itself before connecting, this guide to Base chain DeFi gives a good overview of the environment.
What the approval does
Many new users worry that clicking connect gives an app full control. It doesn't.
A standard wallet connection usually lets the app do a limited set of things, such as:
See your public wallet address
Detect the current network
Prompt you for future approvals when an action needs your signature
It does not mean the app can move your funds freely just because you connected. Actual asset movement requires additional permissions and confirmations.
Depositing stablecoins
If you want to put USDC to work after connecting, the flow usually looks like this:
Fund your wallet with USDC on Base
Keep a small amount of network gas token available if the transaction requires it
In the app, choose the deposit action
Review the amount and any approval request
Confirm in your wallet
The wallet becomes practical instead of theoretical. It's no longer just an identity tool. It becomes the signing layer that lets you move from holding stablecoins to deploying them.
Yield Seeker is one example of this model. Users connect a wallet on Base, deposit USDC, and use the platform to manage automated stablecoin yield workflows through the app interface while retaining wallet-based access and withdrawals.
What to watch for during your first deposit
Keep the first action small and boring. You're not testing returns yet. You're testing your process.
Check these items carefully:
Correct network so you're on Base
Correct token so you're sending the intended asset
Wallet popup details before every approval
App URL to avoid phishing copies
Once you've done one clean connection and one clean deposit, the whole DeFi wallet experience feels much less intimidating.
Essential Security and Recovery Practices
Security in crypto isn't a one-time checklist. It's an operating habit.
That matters even more now that wallets have become a normal part of digital finance. J.P. Morgan reported that 60% of consumers were using a mobile wallet to make digital payments, and projected that global digital wallet sales would exceed $10 trillion by 2025 in its digital wallet report. As wallets become mainstream, the basics of wallet security matter more, not less.
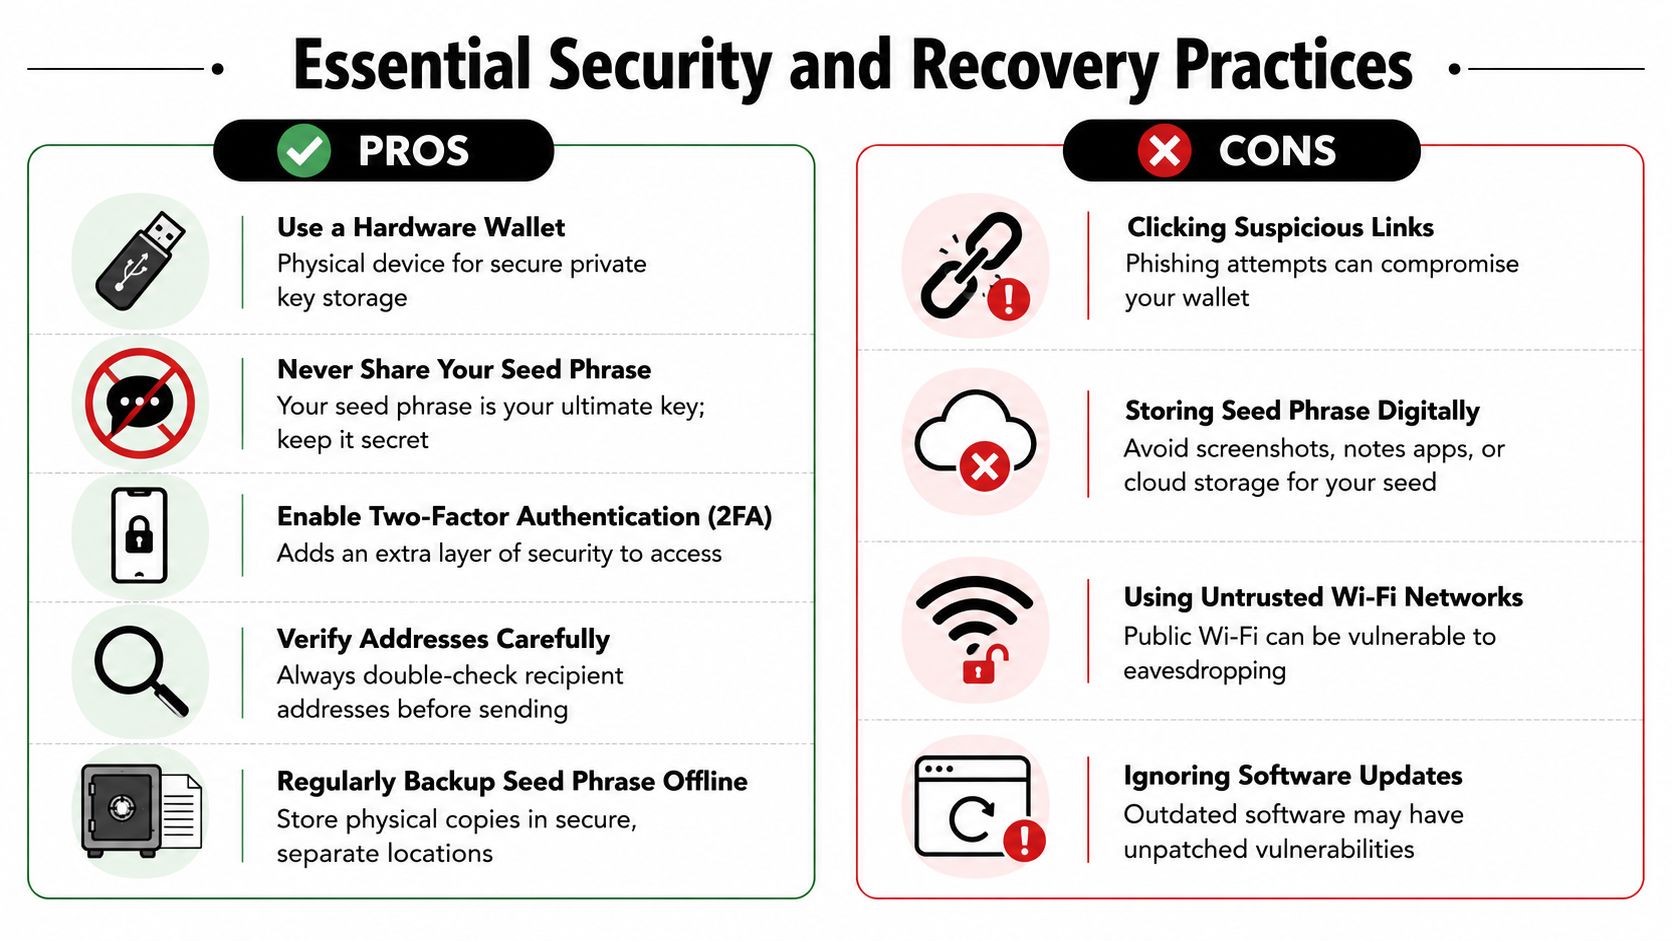
Do this
Keep your seed phrase offline: Paper or other offline storage reduces the chance of remote compromise.
Bookmark official apps and websites: This cuts down the risk of landing on fake wallet or dApp pages.
Verify addresses carefully: A copied address can be wrong, truncated, or replaced by malware. Check it before sending.
Use a hardware wallet for larger balances: It adds separation between daily browsing and key signing.
Update wallet software: Security fixes only help if you install them.
Not that
Don't share your seed phrase with anyone: Real support staff won't ask for it.
Don't store the phrase in screenshots or notes apps: Convenience here creates an obvious attack path.
Don't trust random DMs: “Support” messages are a common route into scams.
Don't approve prompts you don't understand: If a wallet popup is confusing, stop and verify before signing.
A wallet is secure only when your habits are secure. Good software helps, but it can't rescue careless approvals or a leaked seed phrase.
How recovery actually works
Recovery matters because devices fail. Browsers get wiped. Phones are lost.
If that happens, the normal process is:
Install the wallet app again on a new device
Choose import or restore wallet
Enter the seed phrase in the correct order
Set a new local device password
Reconnect the wallet to the networks and apps you use
That process is why the seed phrase deserves so much attention. It's not a backup suggestion. It's your recovery path.
A simple security tiering model
You don't need enterprise-grade complexity to be safer. Many benefit from this progression:
Learning phase: one hot wallet, small amount, careful practice
Regular use: hot wallet for activity, hardware wallet for stored funds
Higher stakes: separate wallets for separate purposes so one mistake doesn't expose everything
That kind of separation is boring. It's also effective.
Recommended Workflows for Different Users
The best wallet setup depends on what you're trying to do. People already make this tradeoff in everyday payments. Many rely on a mobile wallet for daily transactions while keeping a physical wallet for backup cards and cash, and that maps well to crypto where a hot wallet handles active use and a cold wallet protects the bulk of assets, as reflected in this discussion of the physical-to-digital wallet transition.
That analogy helps because it removes the false choice. You usually don't need one perfect wallet. You need the right combination.
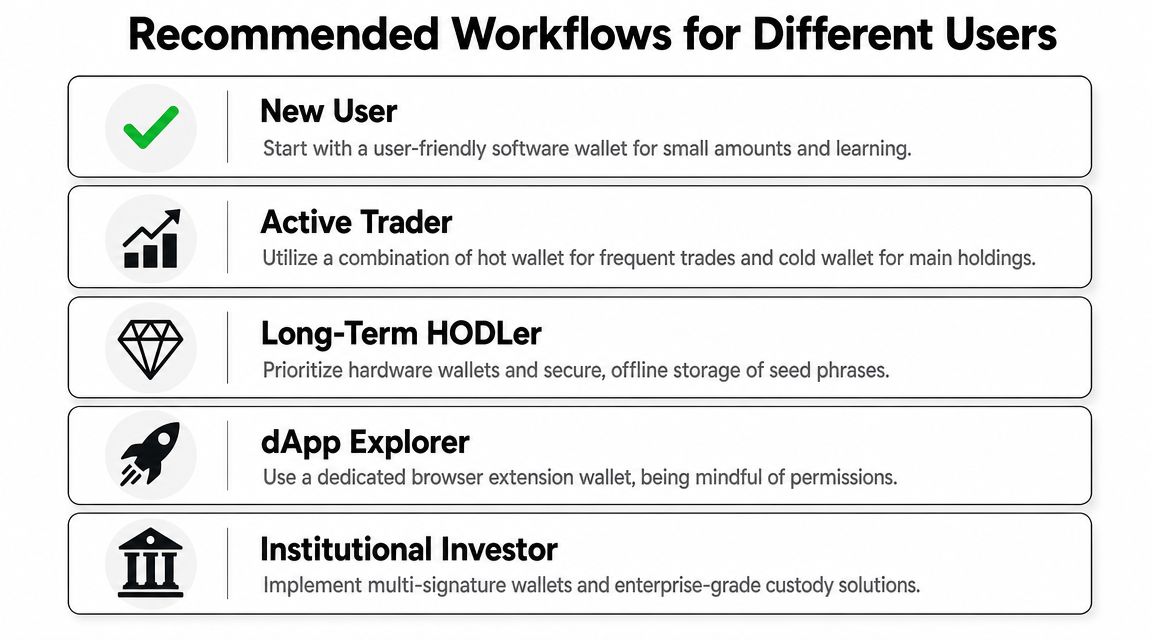
New user
Start simple.
Use one browser-extension hot wallet. Fund it with a small amount. Learn how receiving, connecting, approving, and withdrawing work before you add more tools.
Best fit:
One non-custodial hot wallet
Small balances
One or two trusted dApps
Offline seed phrase backup
Busy investor
This user wants yield exposure without turning wallet management into a hobby. The right approach is usually split by purpose.
Keep an active hot wallet for deposits, monitoring, and routine dApp interactions. Keep the bulk of funds in a hardware wallet, moving capital in when needed.
A practical workflow looks like this:
User Type | Working Setup | Main Benefit |
|---|---|---|
Beginner | One hot wallet | Fast learning with low complexity |
Busy investor | Hot wallet plus hardware wallet | Better balance between convenience and protection |
Team or treasury | Shared control wallet setup | Clearer access control and operational safety |
dApp explorer
If you like trying new protocols, don't use your main storage wallet as your experimentation wallet.
Use a dedicated hot wallet for exploration. Treat approvals carefully. Revoke or clean up permissions as needed. Keep only the amount you're willing to expose to that environment.
Separate your “try things” wallet from your “store value” wallet. Curiosity is good. Mixing every activity into one address usually isn't.
Teams and treasuries
Once more than one person needs access, personal wallet patterns start breaking down. A team needs role clarity, approval logic, and safer operational control.
That usually means moving toward multi-signature or smart contract wallet setups so no single person can act unilaterally with treasury funds. The exact implementation depends on the team, but the principle is consistent: shared capital needs shared controls.
Long-term holder
If your main goal is preservation, convenience should lose the argument.
A hardware wallet, strong offline backups, and minimal transaction frequency fit this profile far better than constant app connections. Use a smaller hot wallet only when you need it.
The main takeaway is simple. Your wallet strategy should match your behavior, not your ambitions. Pick the setup you'll maintain correctly.
If you're ready to move from learning to action, Yield Seeker gives you a practical way to connect a wallet on Base, deposit USDC, and manage stablecoin yield through an AI-guided workflow without manually jumping between protocols every day.